How to Host a Dinner Party Without the Stress
Hosting a dinner party doesn't have to mean frazzled nerves and last-minute chaos. With a bit of forward planning, a streamlined kitchen setup, and a handful of polished touches, you can pull off an evening that feels relaxed, memorable, and effortless — even if it took real effort behind the scenes.
The key is getting as much done as possible before anyone walks through the door. Set the table early, chill the drinks, prep your ingredients, and map out your cooking timeline in advance. That way, when your guests arrive, you're free to greet them properly and actually enjoy the evening — instead of disappearing into the kitchen every ten minutes.
This guide walks through everything that goes into a great dinner party: guest numbers, table styling, menu planning, timing, etiquette, and a full hosting checklist you can lean on.
Step 1: Decide What Kind of Evening You're Hosting
Before you touch the menu or send a single invite, settle on the mood you're going for.
Your dinner party might be:
- A relaxed supper with friends
- A formal three-course affair
- A seasonal gathering
- A birthday or anniversary celebration
- A themed evening
- A festive dinner — think Christmas or Chinese New Year
- A tasting menu built around a few standout ingredients
- A casual, sharing-style meal
Whatever you choose sets the tone for everything downstream — the guest list, the table setting, the menu, and how formal (or not) the whole thing feels.
A laid-back supper suits sharing plates, mismatched tableware, and drinks guests can pour themselves. A more formal occasion calls for individual place settings, printed menus, multiple courses, and wines chosen with a bit more care.
Step 2: Settle on the Guest List
If this is your first time hosting, keep the group small. Four to six guests is a sweet spot — enough for a lively table, small enough that you're not overwhelmed in the kitchen.
Even numbers tend to work best around rectangular or oval tables, since they balance out visually and make seating simpler. That said, the right number really comes down to your table size, your space, and how easily people can move around the room.
Ask yourself:
- How many people can actually sit comfortably?
- Do I have enough plates, cutlery, and glasses?
- Can I cook this menu without losing my mind?
- Will everyone be able to join the conversation?
- Does anyone need extra space or accessibility considerations?
- Do the guests already know each other?
Don't cram people in. Everyone needs elbow room, and chairs should never be so tight that sitting down (or getting up) becomes an ordeal.
Step 3: Send Invitations Early
Give people plenty of notice — especially around busy times of year or for anything with a special-occasion feel.
Your invite should cover:
- Date and arrival time
- A rough finishing time, if that matters
- Address and parking details
- Dress code
- Whether there's a theme
- A request for dietary info
- Whether guests should bring anything
- Whether it's a seated meal or a buffet
For a bigger or more formal gathering, send invitations several weeks out. For something casual, one to two weeks is usually fine.
Ask guests to flag any allergies or dietary needs early — it gives you real time to plan around them instead of scrambling for a substitute the night before.
Step 4: Ask About Allergies and Preferences
Never assume everyone can eat everything. Ask, directly but tactfully, about:
- Allergies
- Intolerances
- Vegetarian or vegan diets
- Religious dietary requirements
- Foods people simply avoid
- Strong dislikes
- Medical conditions affecting eating or drinking
Treat allergies with far more caution than preferences. If someone has a serious one, read labels carefully and take real steps to avoid cross-contamination while cooking.
Jot down each guest's requirements somewhere you won't lose it — this becomes genuinely useful once you're juggling several courses or specialty ingredients.
And never make a guest feel awkward about their needs. A thoughtful alternative, presented as simply part of the menu rather than a workaround, goes a long way.
Step 5: Build a Menu That Actually Flows
A good dinner-party menu is tasty, doable, and well-paced. Avoid stacking dishes that all demand your attention at the same moment.
A simple shape to follow:
- A welcome drink and small nibble
- A starter you can make ahead
- A main with one or two sides
- A dessert that's ready before guests even arrive
- Coffee, tea, or a small sweet to finish
Balance things by weighing:
- Rich against light
- Crisp against soft
- Hot against cold
- Fresh against comforting
- Colour and variety on the plate
- How much last-minute effort each dish demands
If the main is rich, pair it with a lighter starter and a fresh side. If the main needs hands-on cooking right before serving, make sure dessert is already done and waiting.
A dinner party built around excellent ingredients doesn't need to be complicated — a few standout products, prepared simply, often land better than an overworked menu.
Step 6: Match the Menu to Your Kitchen
Choose dishes your kitchen can actually support.
Think about:
- How many oven shelves you have
- Whether food needs to be served piping hot
- Fridge space
- Whether you own enough serving dishes
- Cooking times across the whole meal
- What can be prepped ahead
- How much washing-up you're signing yourself up for
Try not to plan several dishes that all need the oven at different temperatures, or multiple pans that all need stirring at once.
If oven space is tight, lean on:
- A slow-cooked main
- A room-temperature starter
- A dessert made well in advance
- Vegetables that reheat gently
- A salad tossed together just before serving
Step 7: Write a Proper Shopping List
Organise your list by category instead of trying to hold it all in your head.
Cover:
- Meat, fish, or plant-based proteins
- Fruit and vegetables
- Dairy and eggs
- Bread
- Herbs and spices
- Oils, vinegars, condiments
- Wine and other drinks
- Coffee and tea
- Ice
- Garnishes
- Candles and table decor
- Napkins and other tableware
Check your cupboards first — you probably already have staples like salt, flour, stock, oil, and sugar.
Buy specialty or standout ingredients from a supplier you trust, and time your fresh shopping so ingredients stay at their best while still leaving room to handle any surprise shortages.
Step 8: Front-Load the Prep
The easiest dinner parties are the ones where most of the work happened days earlier.
Depending on your menu, you can usually get ahead on:
- Sauces and dressings
- Stocks
- Chopped vegetables
- Marinating meat or fish
- Pastry
- Braised dishes
- Dessert
- Washed salad leaves
- The table setting
- Chilling wine and soft drinks
- Flowers
- Serving dishes
- Place cards
- A playlist
Label everything you prep and store it properly. Keep a running note of what's done and what's still outstanding.
A good rule of thumb: pick at least one course you can finish entirely before guests arrive. Dessert, ideally, should need zero fuss on the night.
Step 9: Build a Timetable
A written schedule keeps small tasks from snowballing into last-minute panic.
Sample dinner-party timetable
| Time | Task |
|---|---|
| The day before | Shop, make dessert, prepare sauces, marinate ingredients, check tableware |
| Morning of | Prep vegetables, set decorations, chill drinks, review the menu, set the table |
| Three hours before | Prep serving dishes, finish any early cooking |
| Two hours before | Wrap up major prep, organise the kitchen, bring meat to room temperature if needed |
| One hour before | Cook or reheat mains, set up the drinks area, get dressed |
| Thirty minutes before | Light candles, put out nibbles, check the bathroom, finish garnishes |
| Fifteen minutes before | Rest food where needed, tidy the kitchen, get ready to greet guests |
| Guest arrival | Offer drinks, greet everyone warmly, let people settle in |
| During dinner | Serve at a relaxed pace, enjoy the conversation |
| After the meal | Offer coffee, tea, or a small sweet treat |
Adjust as your menu demands — cooking times, food safety, and resting periods always come first.
Step 10: Set a Table That Feels Considered
A well-laid table makes guests feel welcome the moment they sit down. It doesn't need to be extravagant — consistency and small details do most of the work.
The basics — each guest needs:
- A placemat and dinner plate
- A side plate, if you're serving bread
- A knife and fork
- A dessert spoon or fork, if needed
- A water glass
- A wine glass, if wine's on offer
- A cloth napkin
Set the dinner plate directly in front of each chair, fork on the left, knife on the right with the blade facing the plate. Water glass sits above the knife, wine glass just beside it.
If you're pouring more than one wine, add the extra glasses as you go rather than cluttering the table from the start.
Napkins
Cloth over paper, whenever you can manage it — it just feels more considered.
Try:
- Folded neatly beside the cutlery
- Laid on the plate
- Tied with ribbon or twine
- Finished with a small herb sprig
- Matched to your colour scheme
- Folded into a simple shape
Keep it practical, not just pretty — a napkin should still be easy to actually use.
Salt, pepper, and condiments
Keep these within easy reach, and decant extras into attractive small dishes rather than leaving jars on the table.
Table linen
A tablecloth or runner sets the tone — pick one that complements your crockery without overwhelming it. Placemats can add a bit of extra depth.
Iron or steam your linens ahead of time. Creases become surprisingly obvious once the candles are lit.
Step 11: Pick a Theme or Colour Palette
A theme adds distinctiveness, especially for birthdays, seasonal dinners, or cultural celebrations — and it doesn't need to be elaborate. A simple palette is often enough.
Pink dinner-party theme
- Blush or dusty-pink napkins
- White or pale pink flowers
- Gold or silver cutlery accents
- Clear glassware
- White crockery
- Pink candles
- Fresh berries or rose-tinted desserts
- Small matching place cards
Chinese New Year theme
- Red and gold accents
- Lantern-style decor
- Seasonal flowers
- Elegant sharing platters
- Tea served after the meal
- Red napkins or place cards
- Dumplings, noodles, roast meats, or other traditional dishes
Keep decorations in support of the food, not competing with it — skip anything tall enough to block sightlines across the table.
Step 12: Decorate with Restraint
The best decorations are simple and low enough that people can still see and hear each other.
Good options:
- Small flower vases
- Seasonal foliage
- Taper candles
- Tea lights
- A bowl of fruit
- Place cards
- Small themed touches (Easter eggs for an Easter table, say)
- A table runner
- Coordinated napkins
Skip strongly scented candles or flowers near the food — the fragrance can clash with what you've cooked.
If you're using real candles, keep them well clear of napkins, sleeves, and serving dishes. Battery candles are a solid substitute if open flame isn't practical.
Step 13: Set Up the Drinks Area
Get drinks ready before guests arrive so people can serve themselves where it makes sense.
Have on hand:
- Chilled white, rosé, or sparkling wine
- Red at the right serving temperature
- Still and sparkling water
- A non-alcoholic option
- Ice
- Glassware
- Bottle openers
- Napkins
- A jug or carafe
- A small dish for used corks
A welcome drink can be as simple as sparkling water with citrus, a glass of wine, or one pre-made cocktail. You don't need to hand-craft every glass individually.
If you're pairing wine with food, plan it ahead: lighter wines generally suit delicate dishes, fuller-bodied wines suit richer ones — though personal taste always has the final say.
Step 14: Put Out a Welcome Bite
A small nibble keeps guests happy while everyone trickles in, and stops anyone getting too hungry before dinner actually starts.
Good choices:
- Marinated olives
- Warm bread with a dip
- Cheese biscuits
- Small savoury pastries
- Smoked fish on toast
- Nuts (allergy-permitting)
- Vegetable crudités
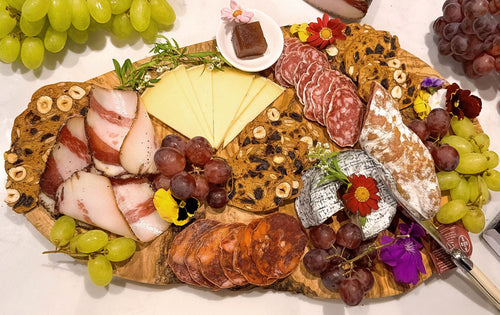
- A small seafood or charcuterie spread
Keep it light — it's there to whet the appetite, not replace the starter.
Step 15: Make Arrivals Feel Warm
When guests arrive, drop whatever you're doing and greet them at the door. A genuinely warm welcome matters more than a perfectly timed garnish.
Take coats, offer a drink, and introduce anyone who hasn't met.
A solid arrival routine:
- Open the door and greet guests personally
- Take coats and point out where to put belongings
- Offer a welcome drink
- Introduce unfamiliar faces
- Point out the bathroom
- Steer guests toward the sitting or drinks area
- Give yourself a moment to finish up final prep
If something's not quite ready, don't draw attention to it. Guests take their cue from you — stay calm, and they will too.
Step 16: Serve Without a Hitch
Before serving, give a quick, casual explanation of the menu if there's anything unusual on it — enough to spark interest without turning dinner into a formal presentation.
When you serve:
- Serve guests before yourself, where practical
- Offer a fair portion rather than piling plates high
- Keep serving dishes accessible for seconds
- Check everyone has what they need
- Bring sauces and condiments out with the right course
- Skip the repeated apologies over small imperfections
- Let some time breathe between courses
- Clear plates quietly and efficiently
You don't need to whisk away every plate the second it's empty — watch the table and let conversation carry on naturally.
If something's running late, offer more wine, water, or conversation instead of visibly panicking.
Step 17: Mind Your Dinner-Party Etiquette
As host, you set the tone. Small gestures carry real weight.
As the host:
- Greet every guest personally
- Introduce people who don't know each other
- Make sure no one gets left out of the conversation
- Keep dietary needs private and respected
- Give a brief rundown of unfamiliar dishes
- Offer both alcoholic and non-alcoholic drinks
- Check in on guests' comfort
- Skip talk of what the ingredients cost
- Don't run down your own cooking
- Keep conversation warm and inclusive
- Steer clear of anything likely to cause friction
- Thank guests for coming before they head out
As a guest, it helps to:
- Show up on time
- Flag allergies and dietary needs ahead of the day
- Bring a gift only if it's appropriate or asked for
- Never turn up with an uninvited plus-one
- Compliment the host sincerely
- Avoid pushing for menu changes
- Offer to help without taking over
- Respect the host's home
- Thank the host before leaving
Don't expect guests to pitch in with the washing-up. If someone offers and it would genuinely help, accept graciously — but never make guests feel on the hook for your kitchen.
Step 18: Pace the Courses
A dinner party should feel unhurried, not rushed.
A typical three-course rhythm:
- Welcome drink: 20–30 minutes
- Starter: 20–30 minutes
- Pause before the main: 10–15 minutes
- Main course: 30–45 minutes
- Pause before dessert: 10–20 minutes
- Dessert and coffee: 30–45 minutes
Treat these as loose guidelines — conversation, occasion, and the style of the meal should really set the pace.
For something informal, sharing dishes in the centre of the table works beautifully. For something more formal, individually plated courses feel more polished.
Step 19: Keep the Kitchen From Spiralling
A tidy, organised kitchen keeps you calm through the evening.
Before guests arrive:
- Empty the dishwasher
- Clear the worktops
- Put ingredients away
- Set up a washing-up bowl if needed
- Keep a clean tea towel handy
- Position bins somewhere easy to reach
- Organise utensils and serving spoons
- Keep a dedicated spot for used dishes
- Wipe up spills right away
- Keep raw and cooked ingredients separate
The kitchen doesn't need to stay spotless all night — just focused on food safety, clear surfaces, and whatever the next course needs.
Step 20: Plan for Things Going Sideways
Even the best-planned dinners hit a snag now and then — a late guest, a dish running behind, a sauce that didn't quite come together.
Have a few fallbacks ready:
- A flexible appetiser you can stretch out
- A simple backup side dish
- A dessert that doesn't hinge on precise timing
- Extra bread and salad on standby
- A non-alcoholic drink ready to pour
- Takeaway containers for leftovers
- A simple dietary-need alternative
- Small buffer time built into your schedule
If something goes wrong, fix it quietly and keep moving. Most guests remember the warmth of the evening far more than a minor culinary slip.
Complete Dinner-Party Checklist
Several weeks before
- Choose the date and style
- Decide on guest numbers
- Send invitations
- Ask about allergies and dietary needs
- Choose the menu
- Think through wine and drinks
- Check if you need extra tableware
- Settle on a theme or colour scheme
One week before
- Confirm the guest list
- Check recipes and cooking times
- Order any specialty ingredients
- Check serving dishes and glassware
- Plan the seating
- Choose music
- Buy decorations, candles, napkins
- Check the dining area and bathroom
- Write a detailed shopping list
One or two days before
- Buy non-perishables
- Prep sauces, marinades, and dessert
- Wash or prep vegetables where possible
- Chill drinks
- Iron the table linen
- Polish glassware and cutlery
- Prepare place cards
- Clean the dining and entrance areas
- Review your cooking schedule
On the day
- Buy fresh ingredients
- Prep make-ahead dishes
- Set the table
- Arrange flowers and decorations
- Chill the drinks
- Prepare the welcome bite
- Double-check dietary alternatives
- Empty the dishwasher
- Tidy the kitchen
- Set out serving spoons and dishes
- Build a playlist
- Leave time to shower and get dressed
Thirty minutes before guests arrive
- Light candles safely
- Put out the welcome bite
- Fill water jugs
- Check the room temperature
- Clear a spot for coats and bags
- Check the bathroom
- Finish garnishes
- Run through the menu and timetable one more time
- Take a moment to breathe
During the evening
- Welcome each guest
- Offer drinks
- Make introductions
- Talk through the menu
- Serve at a relaxed pace
- Watch for empty glasses
- Keep everyone in the conversation
- Stay aware of dietary needs
- Clear and refresh the table discreetly
- Offer coffee, tea, or a final treat
After guests leave
- Store leftovers safely
- Refrigerate perishables promptly
- Soak the trickiest dishes
- Turn off candles and appliances
- Check doors and windows are secure
- Leave the deep clean for tomorrow if you need to
- Note what worked well for next time
A Simple Formula for a First-Time Host
If you're hosting for the first time, this formula rarely fails:
- Four to six guests
- One welcome drink
- One make-ahead starter
- One main that doesn't need constant attention
- Two simple sides
- One dessert made in advance
- Two or three wine options
- Still and sparkling water
- A table set with care
- A written timetable
- Plenty of time left over to actually enjoy your guests
The best dinner parties are rarely the most elaborate ones. They're the ones where guests feel comfortable, looked after, and free to relax.
Final Thoughts
Hosting a dinner party is about far more than serving impressive food — it's about creating an atmosphere where people feel genuinely welcome and cared for.
Plan your menu around what you can realistically pull off, get ahead on prep, set the table thoughtfully, and give yourself enough time to get ready before the doorbell rings. Good food, good timing, and real hospitality will make an evening your guests remember for all the right reasons.
Get the preparation right, and hosting stops feeling like a long list of jobs — and starts feeling like what it should be: good food, shared with people you're glad to have around your table.